What is AWS PrivateLink?
AWS PrivateLink is a secure and scalable networking technology that enables private connectivity between Virtual Private Clouds (VPCs), AWS services, and on-premises applications—without exposing traffic to the public internet. By leveraging PrivateLink, organizations can simplify their network architecture, reduce data exposure risks, and ensure secure communication between services. With PrivateLink, services are exposed as private endpoints within a VPC, allowing consumers to connect to them using private IP addresses. This minimizes the need for complex networking configurations like VPC peering or VPNs, and reduces the risk of data leakage by keeping traffic within the AWS network. In the context of our integration, AWS PrivateLink enables Elementary Cloud to securely and privately communicate with supported services, ensuring data privacy, compliance, and a streamlined user experience. We support cross-region PrivateLink and can connect to any region where your cloud is hosted, using VPC peering to link different regions to our production environment securely. Elementary Data maintains a global network of regional VPCs designed for PrivateLink, with strict security controls.Architecture overview
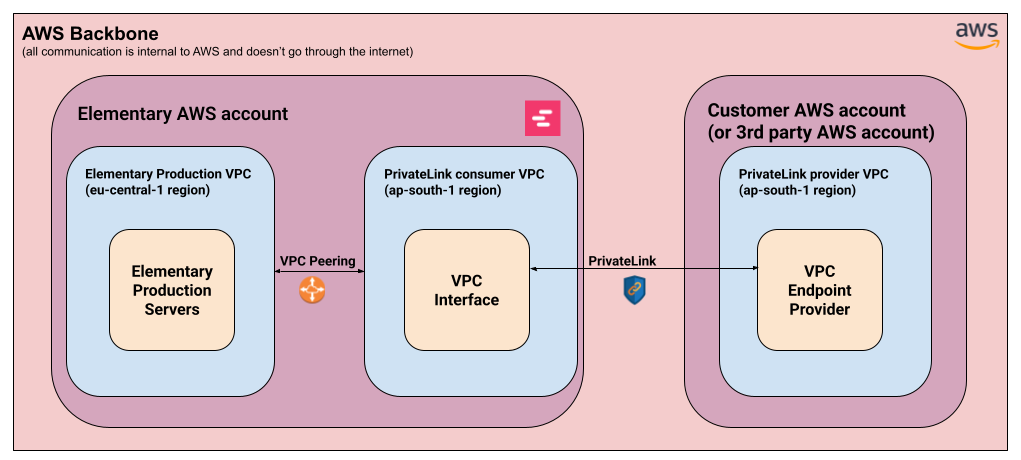 Elementary’s PrivateLink setup consists generally from two parts:
- AWS PrivateLink connection -
- Provider side (Customer / 3rd party) - A VPC endpoint service is set up at the customer’s AWS account (or a 3rd party AWS account in the case of Snowflake). This provides access to a particular service in that account.
- Consumer side (Elementary) - Elementary sets up a dedicated VPC interface that will connect to the integrated service, in the same AWS region as the service. This is done through a dedicated regional VPC created for this purpose.
- AWS VPC Peering:
- Elementary’s production servers are located in the eu-central-1 (Frankfurt) region. For us to be able to access the service exposed through PrivateLink, we connect our main production VPC with the regional VPC mentioned above.
Supported integrations
Snowflake
Snowflake has support for connecting to AWS-hosted Snowflake accounts via PrivateLink. This setup is entirely managed by Snowflake, so Elementary connects with an endpoint service hosted on Snowflake’s AWS account for this purpose. In order to set up a PrivateLink connection with Snowflake, please follow the steps below:-
Open a support case to Snowflake Support
- Ask to authorize Elementary’s AWS account for PrivateLink access.
- Provide Elementary’s account ID in the request -
743289191656
-
Obtain the PrivateLink configuration
-
Once Snowflake’s support team approves the request, obtain the PrivateLink configuration by invoking the following commands (admin access is required):
-
Once Snowflake’s support team approves the request, obtain the PrivateLink configuration by invoking the following commands (admin access is required):
-
Provide Elementary with the configuration obtained in the previous step.
- Elementary will then setup the required infrastructure to connect to Snowflake via PrivateLink.
-
Add a Snowflake environment in Elementary
- Follow the instructions here to set up a Snowflake environment in Elementary.
-
When supplying the account, use
<account_identifier>.privatelink, where the account identifier is the result of the following query: -
In the Snowflake instructions, under the Add the Elementary IP to allowlist section, please add the following private subnets instead of the IP mentioned there:
- 10.0.1.x
- 10.0.2.x
- 10.0.3.x
-
When supplying the account, use
- Follow the instructions here to set up a Snowflake environment in Elementary.
Databricks
Databricks has support for connecting to AWS-hosted Databricks workspaces via PrivateLink. This setup is entirely managed by Databricks, so Elementary connects with an endpoint service hosted on Databrick’s AWS account for this purpose. Note:- You must be a Databricks account admin to perform this setup.
- Your databricks workspace must be deployed on a customer-managed VPC. PrivateLink is not supported with Databricks-managed VPCs.
-
Please provide Elementary with the following details:
- Your databricks workspace URL.
- Your AWS account ID.
- Your AWS region.
-
Register your VPC endpoint
In the account management portal (not your workspace), go to Security -> Networking -> VPC Endpoints,
then click on the “Register VPC Endpoint” button.
You should fill in:
- A name for the VPC endpoint - e.g. “Elementary”.
- Your AWS region.
- The VPC Endpoint ID provided to you by Elementary.

-
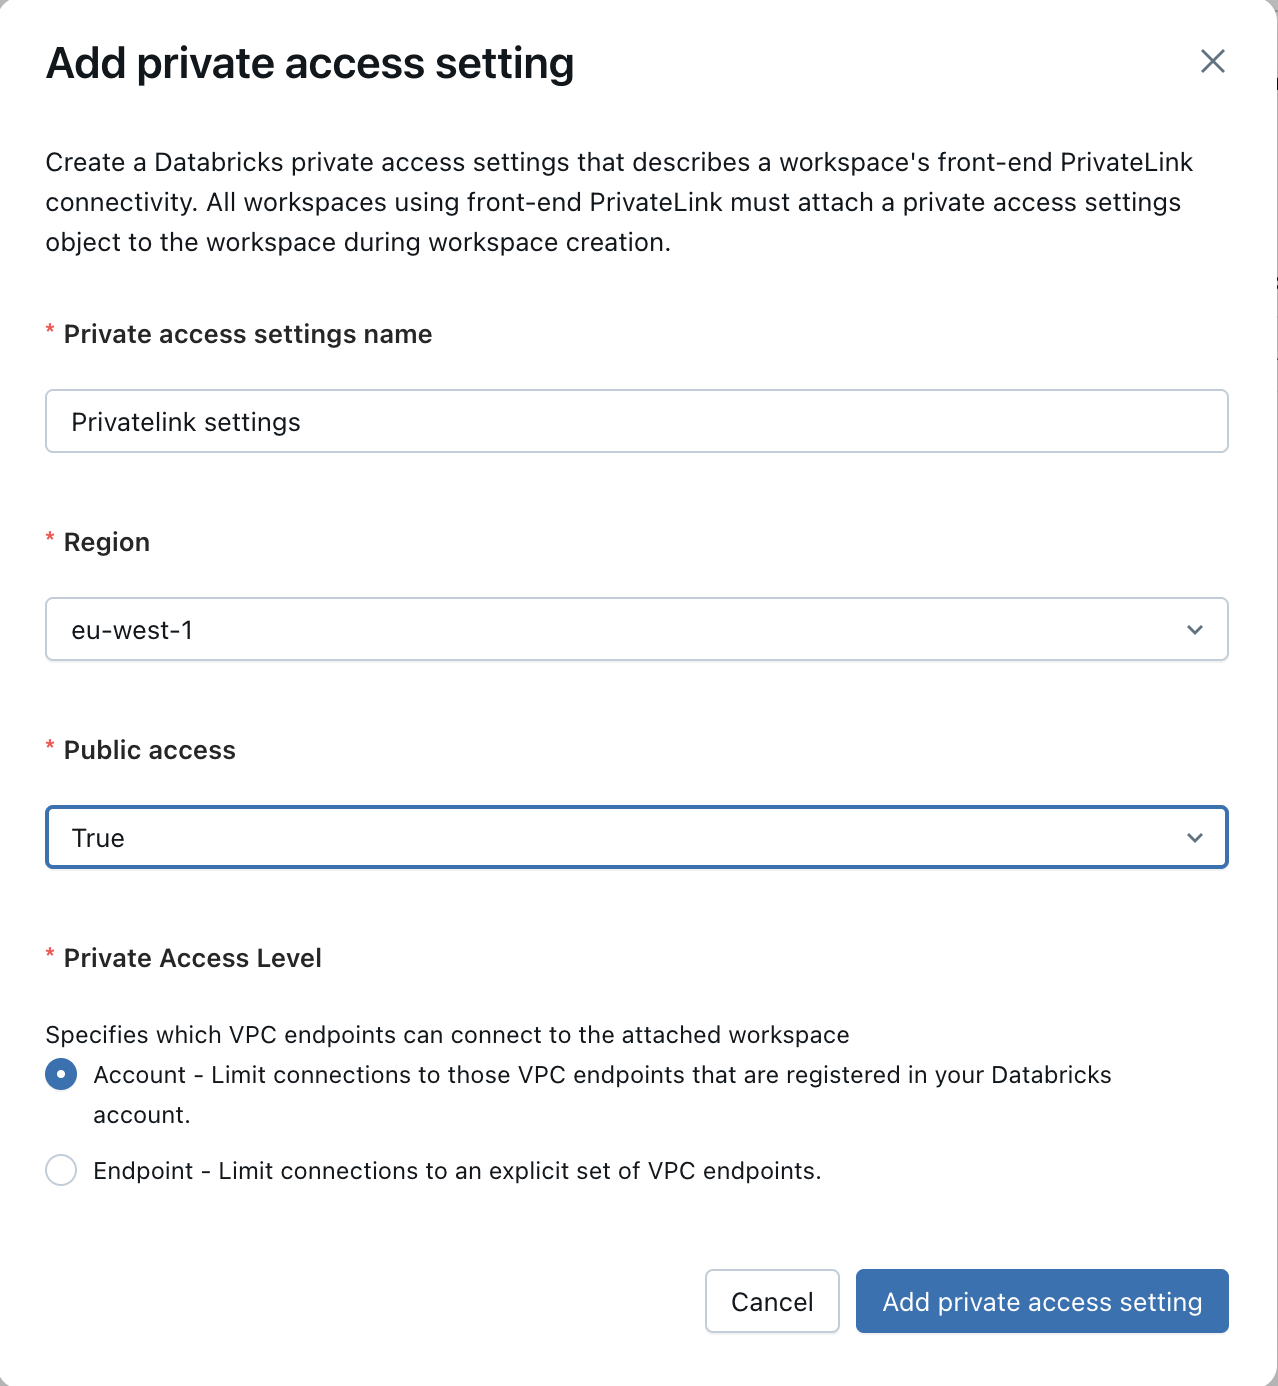
Configure a private access setting
Go to Security -> Private Access Settings.
- If you’ve set up private link with your Databricks instance before, you should already have a private access setting configured. In that case, please ensure that the endpoint allows access to the VPC endpoint created in step (2).
-
If this is the first time you are setting PrivateLink for your databricks workspace:
- Click on “Add private access config”.
- Please fill in the following details:
- A name for your setting: e.g. “Privatelink settings”
- Your AWS region
- Whether or not to allow public access - only set this as False if all your systems and users access your Databricks workspace through privatelink.
- Private access level - either leave as “Account”, or allow-list specific VPCs including the Elementary VPC created in the previous step.
- Add the private access setting to your Databricks workspace Note: If you have already set up Privatelink with Databricks in the past, you can skip this step. Under the Databricks account management portal, go to Workspaces, click on your workspace and then on “Update Workspace”. Then go to “Advanced Configurations”, and under “Private Link”, please attach the setting created in the previous step.
-
Add a Databricks environment in Elementary
After all the previous steps are completed, please reach out to the Elementary team to verify that your Databricks cluster is accessible via PrivateLink.
Once verified, please add a Databricks environment to Elementary by following this guide.
Under the Add the Elementary IP to allowlist section, please add the following private subnets instead of the IP mentioned there:
- 10.0.1.x
- 10.0.2.x
- 10.0.3.x
Github Enterprise Server
Github Enterprise Server can be connected to Elementary Cloud via AWS PrivateLink. This setup requires creating a VPC endpoint service in your AWS account that exposes your GitHub Enterprise Server instance. Prerequisites:- Your Github Enterprise Server instance must be accessible from within your AWS VPC
- You must have administrative access to your AWS account
- Ensure you are working in the correct AWS region where your Github Enterprise Server is deployed
-
Create a VPC Endpoint Service
- Follow the detailed instructions in the Creating a VPC Endpoint Service section below to set up the endpoint service for your GitHub Enterprise Server instance.
-
Add a Github integration in Elementary - Once the VPC endpoint service setup is completed, please proceed to adding a GitHub integration. Note:
- OAuth is not currently supported for Github Enterprise Server, so you should generate a fine-grained token.
- You should use the same Github hostname as you would internally (Elementary will resolve that host to the privatelink endpoint)
Creating a VPC Endpoint Service
The setup below is only required for services that are hosted in your own VPC (e.g. Github Enterprise Server). It is not required for Snowflake or Databricks which manage themselves the server-side PrivateLink setup.Each integration above explicitly states if it requires setting up a VPC endpoint service.
Note: You should create the VPC endpoint service in the same region your service is located in.You can follow the steps below to create an endpoint service via the AWS console.
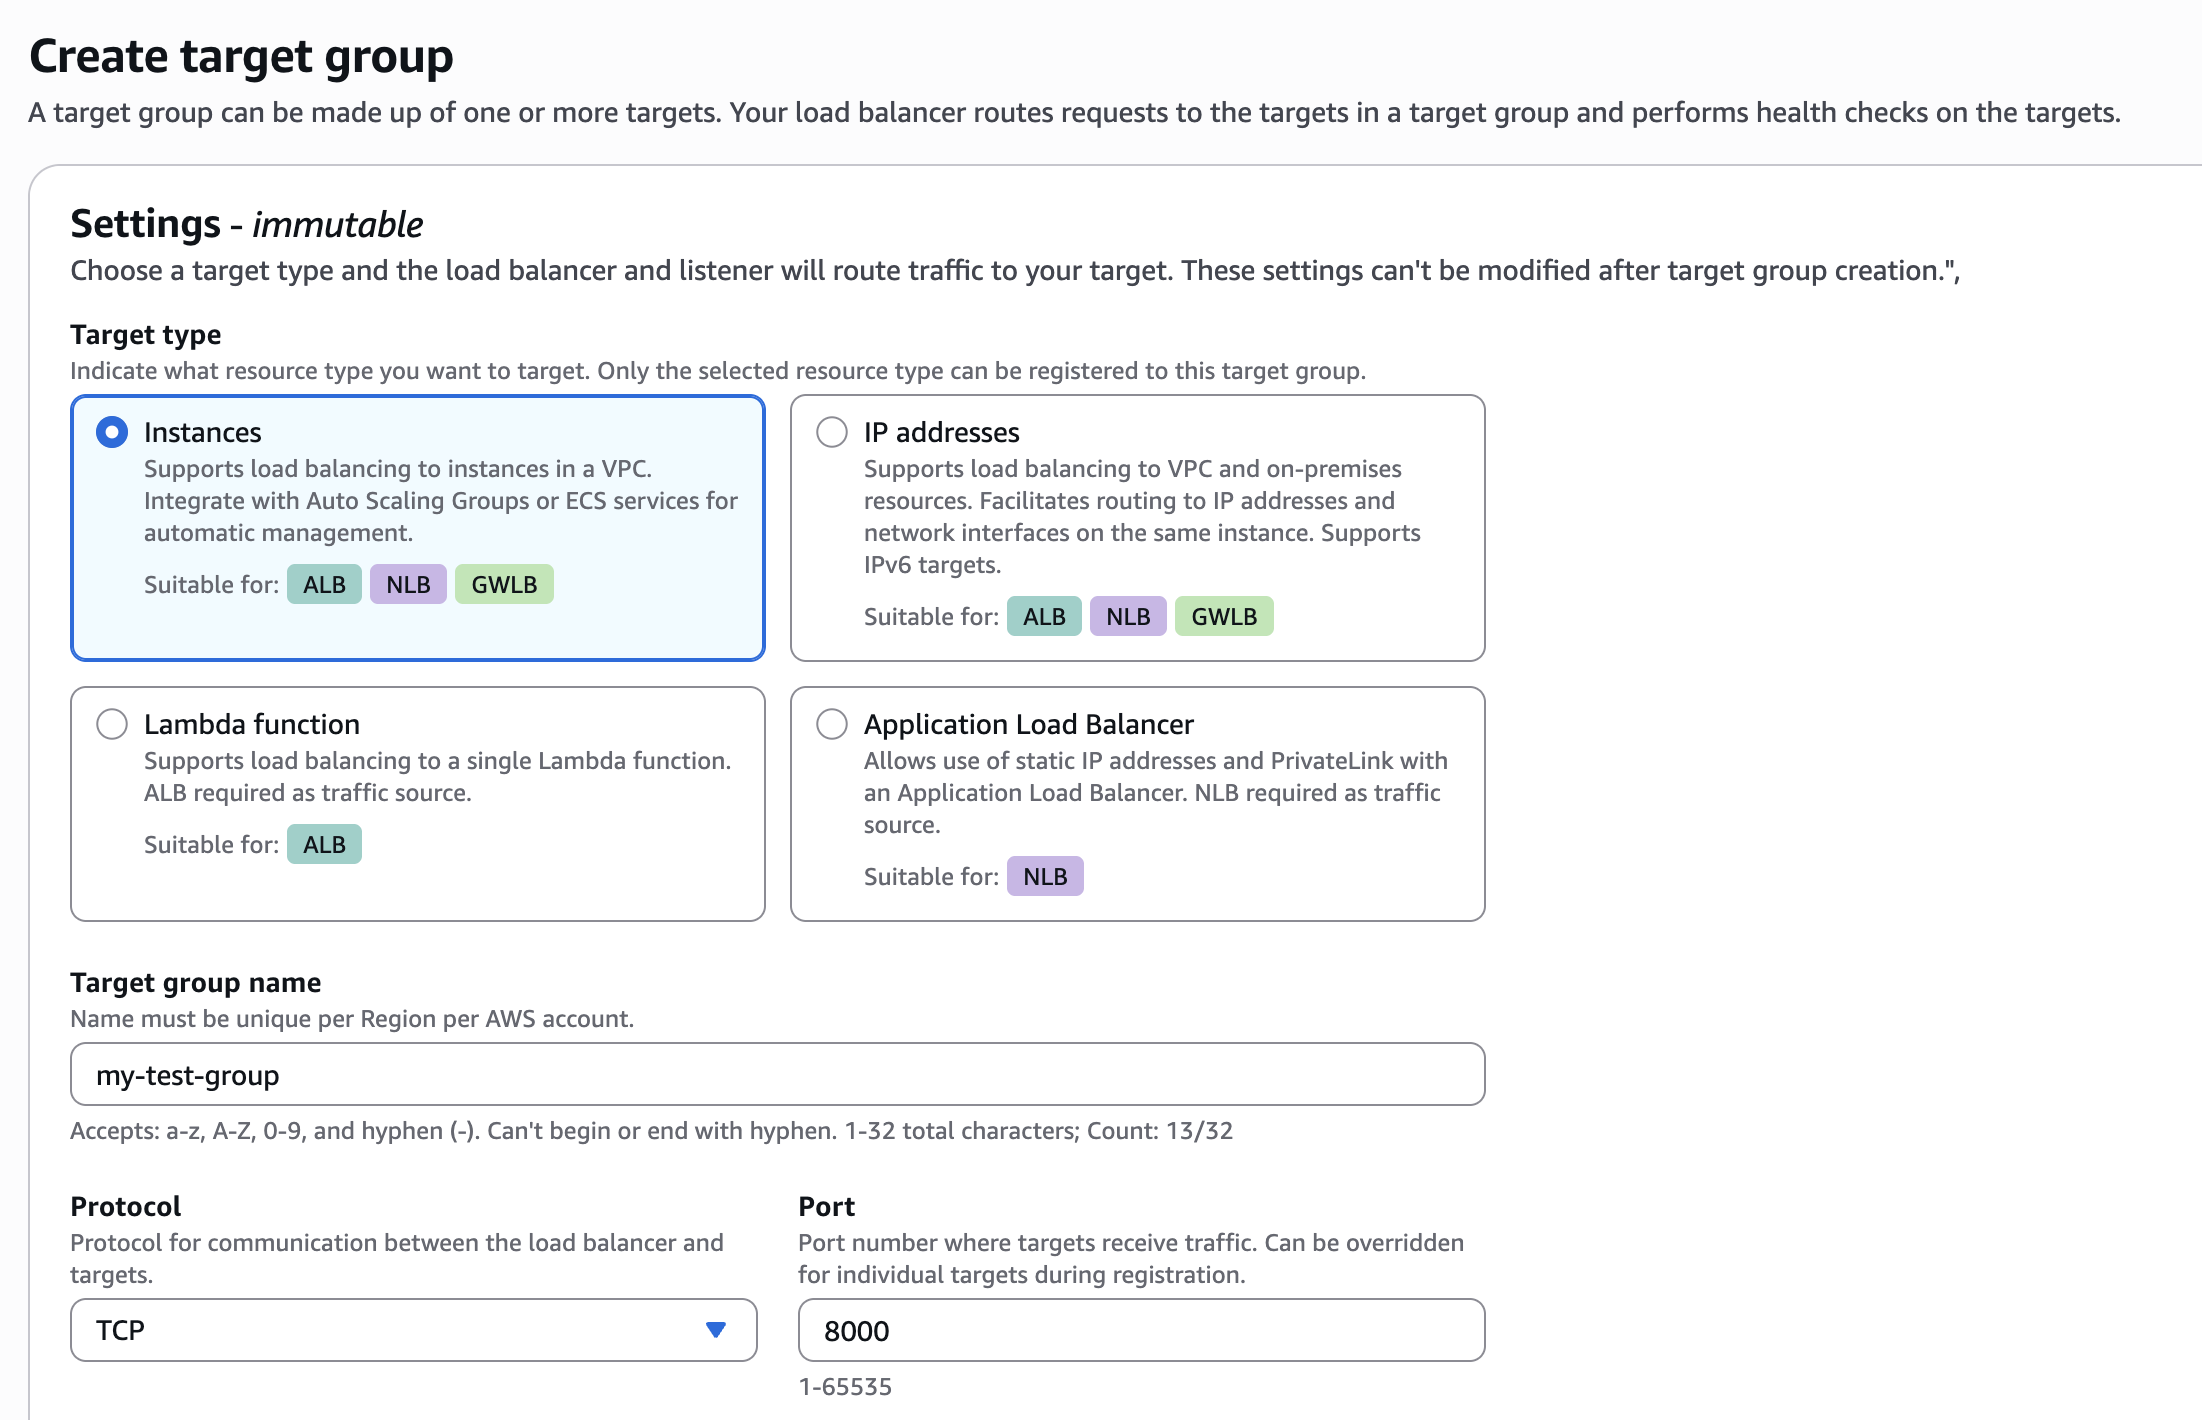
Create a network load balancer to your service
Before setting up the VPC endpoint service, it is required to set up an internal network load balancer pointing to the service you are exposing. Setting up a load balancer consists of the following sub-steps: 1. Create a target group Under the EC2 page in AWS, navigate to the Target Groups menu and click “Create target group”. Please follow the wizard and fill the following details:- Target type - You should select this based on the method you used to deploy your service - e.g. based on Instance or IP address.
- Target group name - Choose a name for the target group
- Protocol : Port - Choose this based on the service you are exposing (normally should be HTTP / HTTPS)
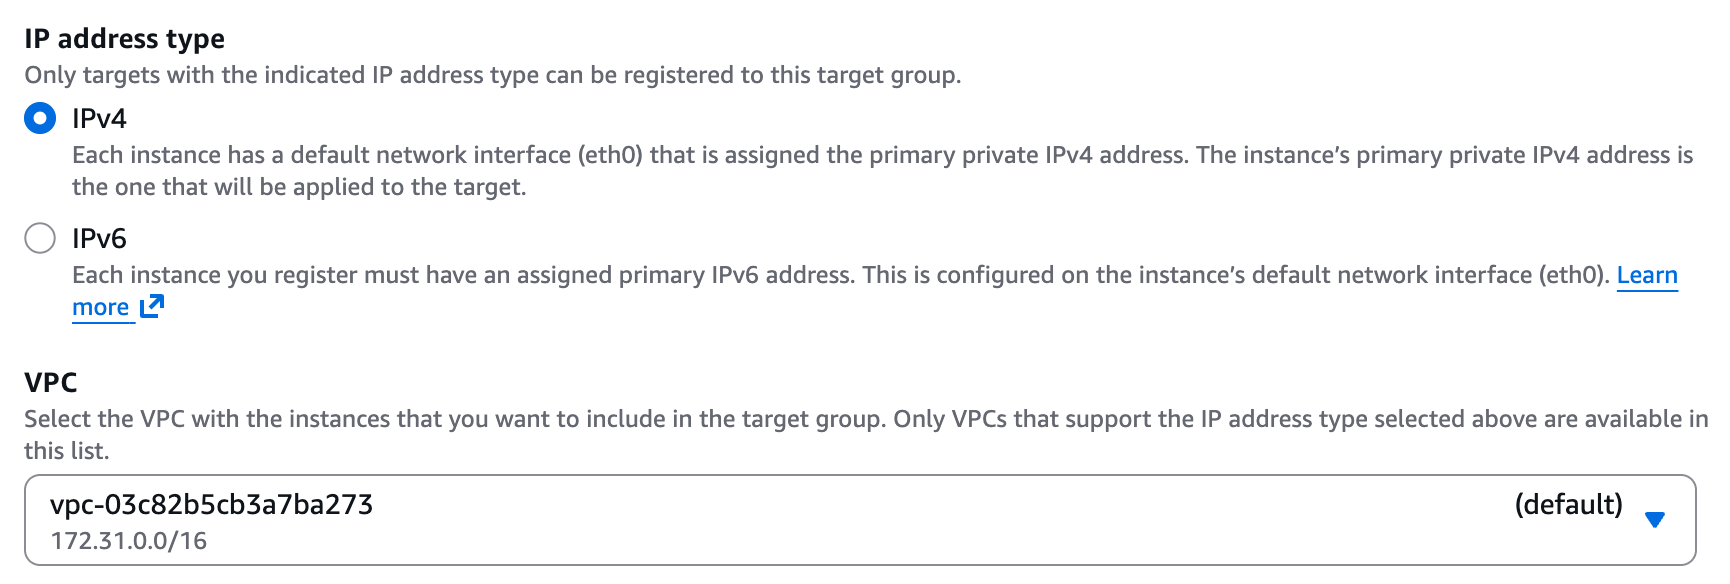
- IP address type - IPv4.
- VPC - The VPC your service is deployed in.
 2. Create a Network Load Balancer (NLB)
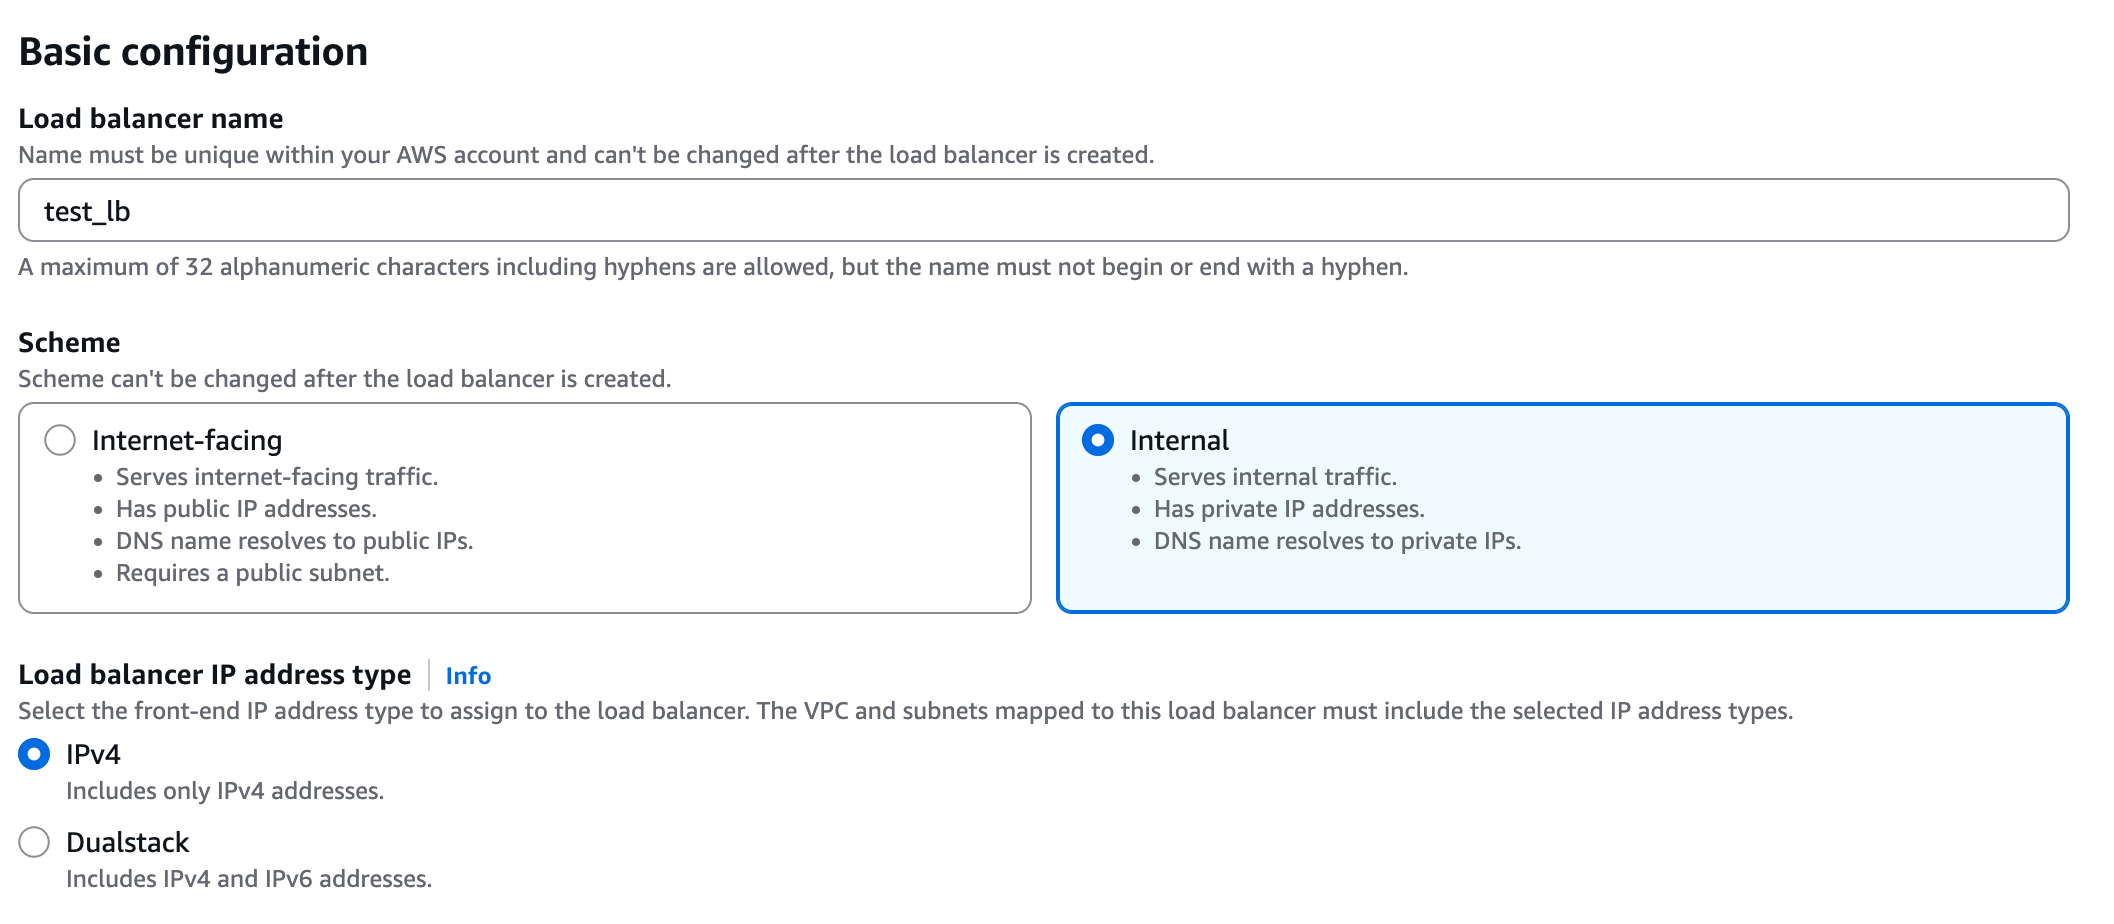
Under the EC2 page in AWS, navigate to “Load Balancers” and click on “Create load balancer”. Choose Network Load Balancer and proceed with the creation. Please follow the wizard and fill the following details:
2. Create a Network Load Balancer (NLB)
Under the EC2 page in AWS, navigate to “Load Balancers” and click on “Create load balancer”. Choose Network Load Balancer and proceed with the creation. Please follow the wizard and fill the following details:
- Load balancer name - Choose a name for the load balanver (e.g. “github-lb”)
- Scheme - Internal.
- Load balancer IP address type - IPv4.
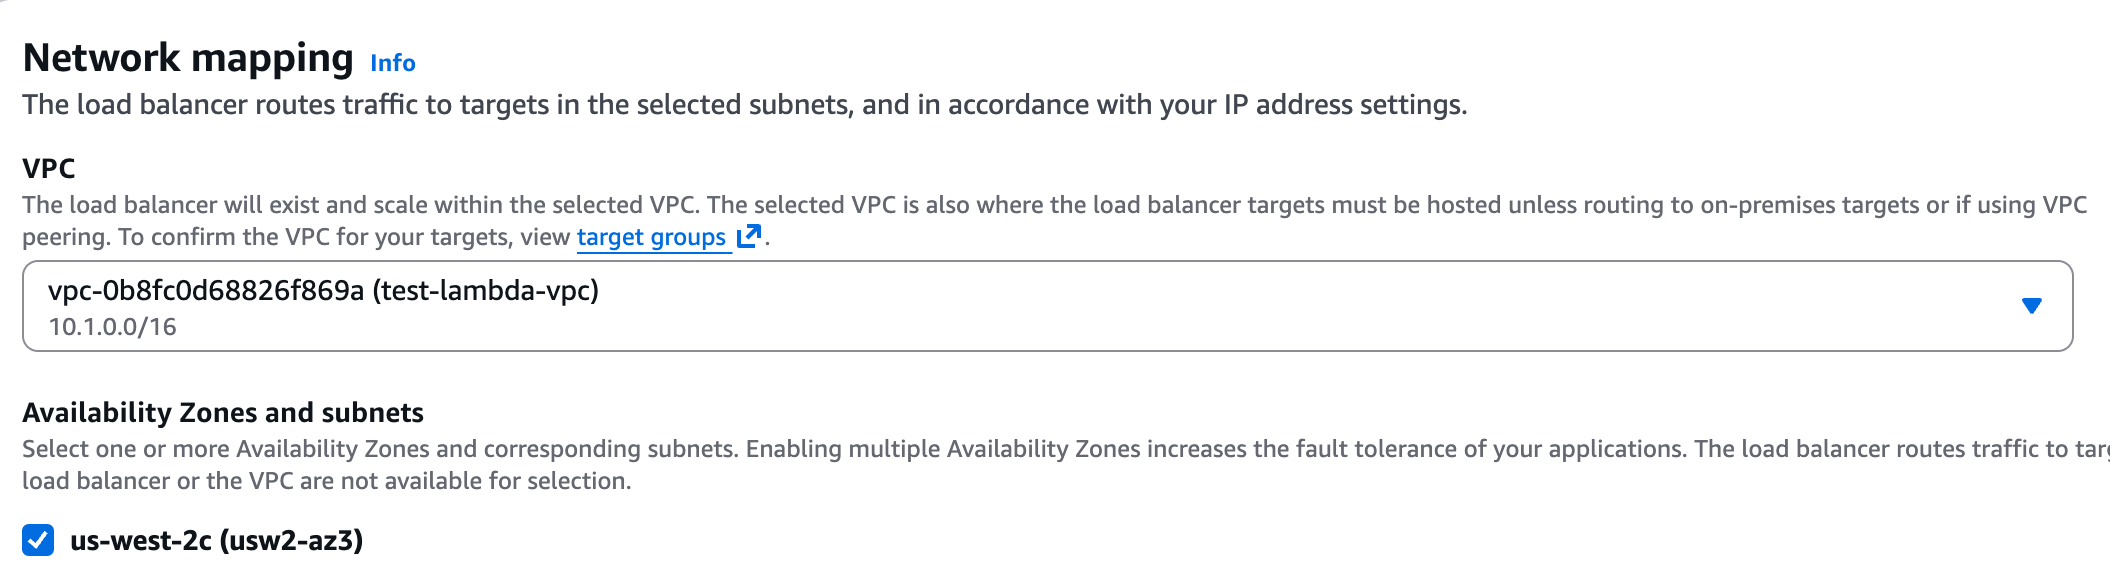
- VPC - Choose same VPC as the one you used for the target group above.
- Mappings - Select one or more private subnets.
- Security groups - Select a security group with access to your service. Please grant access to the relevant ports for your service, to the following IP ranges (these are the internal IPs Elementary may connect to your service from):
- 10.0.1.x
- 10.0.2.x
- 10.0.3.x
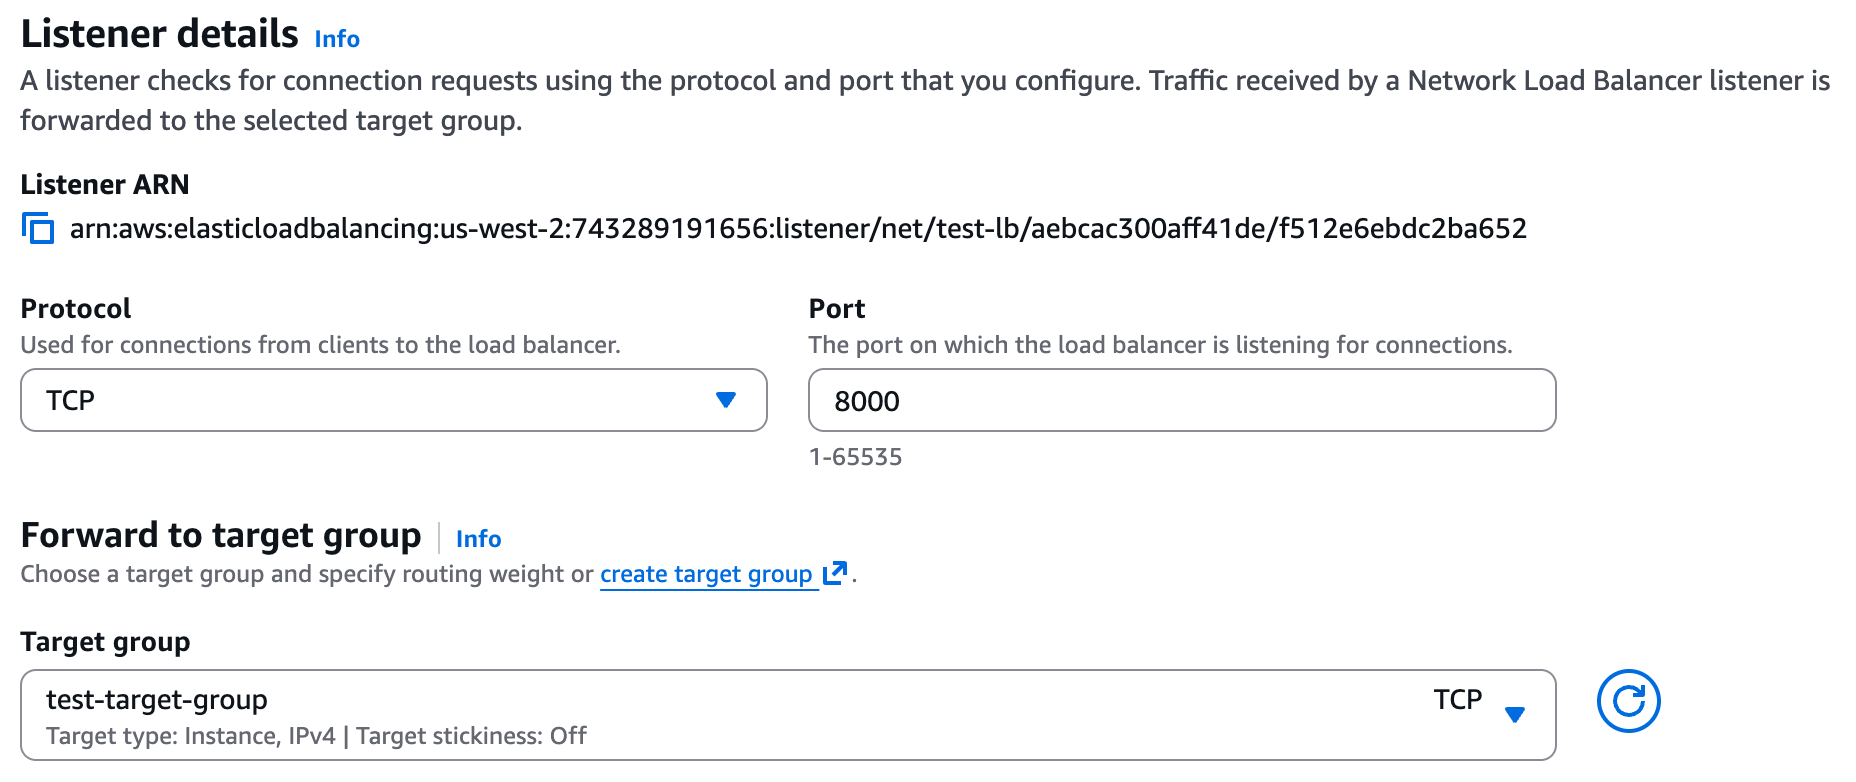
- Listeners - Select the target group, protocol, and port from Step 1.
 3. Verify the Target Group is Healthy
Once the load balancer from the previous step is ready, please navigate to the target group you created above. It should be listed as “Healthy”.
3. Verify the Target Group is Healthy
Once the load balancer from the previous step is ready, please navigate to the target group you created above. It should be listed as “Healthy”.
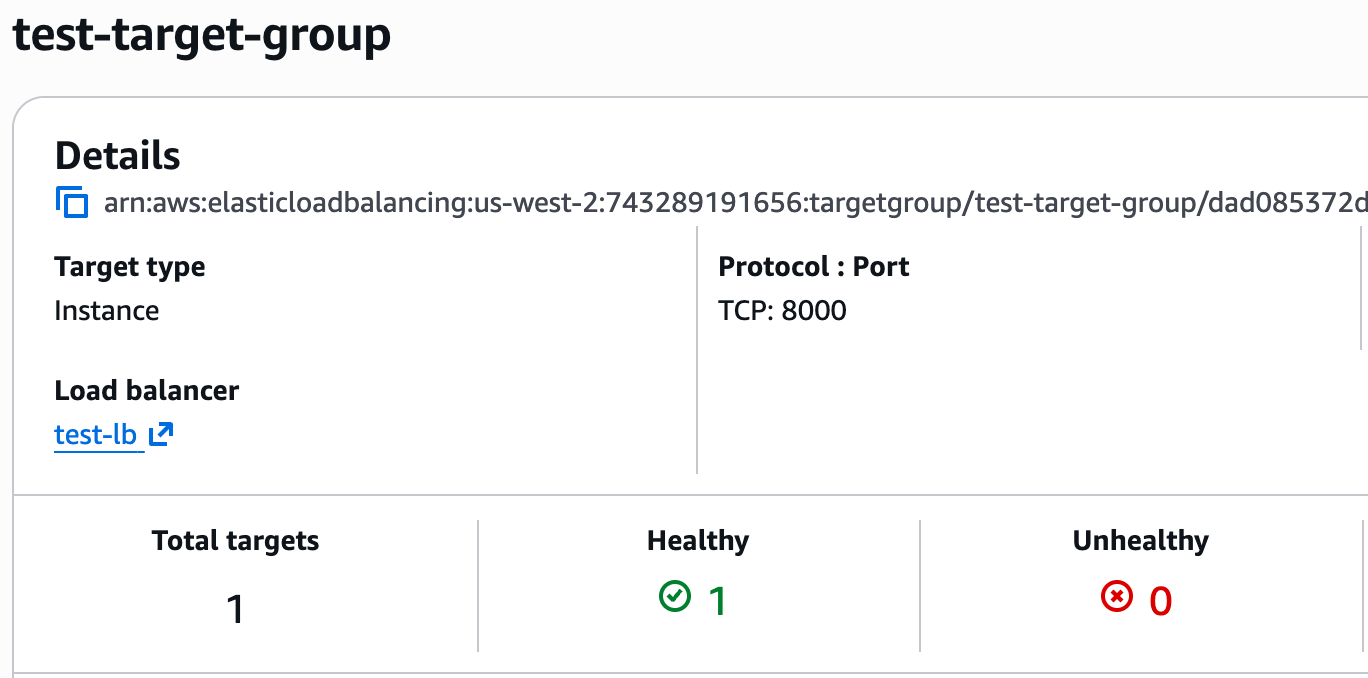 If it appears as “Unhealthy” for some reason, please ensure the security group provides access to the service, that the health check is configured correctly, and of course that the service itself is available.
4. Enable Cross-Zone Load Balancing
If you selected more than one subnet for the load balancer above:
If it appears as “Unhealthy” for some reason, please ensure the security group provides access to the service, that the health check is configured correctly, and of course that the service itself is available.
4. Enable Cross-Zone Load Balancing
If you selected more than one subnet for the load balancer above:
- Navigate back to the “Load Balancer” screen
- Choose the load balancer you created.
- Click on Actions -> Edit load balancer attributes.
- Enable the setting “Enable cross-zone load balancing”.
Create a VPC Endpoint Service and approve access for Elementary
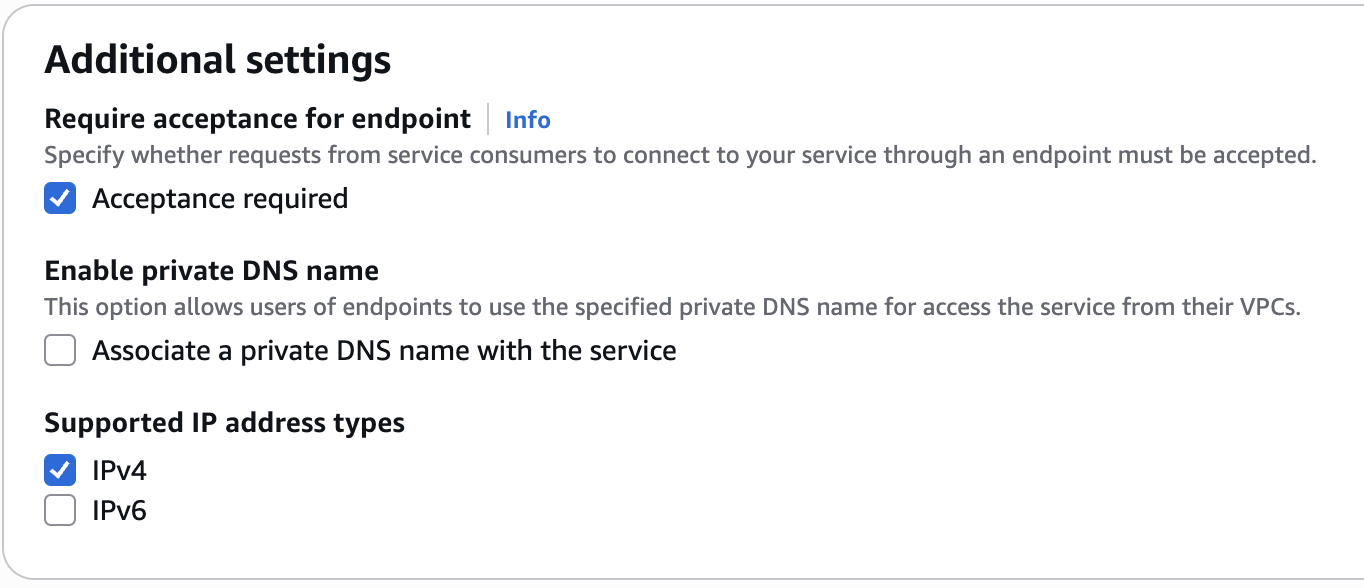
1. Create a VPC Endpoint Service Navigate to the VPC page in AWS, go to “Endpoint services,” and select “Create endpoint service.” Please follow the wizard and fill in the following details:- Name - Choose a name for your VPC endpoint service.
- Load balancer type - Network.
- Available load balancers - Select the network load balancer (NLB) created above.
- Require acceptance for endpoint - Yes (so new connections will require approval, see below)
- Enable private DNS name - No.
- Supported IP address types - IPv4.

 Once the service is created, please go to the “Details” tab and save the “Service name” attribute, you will need later to provide it to the Elementary team.
2. Allow the Elementary Principal
Once the VPC endpoint service is successfully created, navigate to the “Allow principals tab” and click on “Allow Principals”. Then add the following principal:
Once the service is created, please go to the “Details” tab and save the “Service name” attribute, you will need later to provide it to the Elementary team.
2. Allow the Elementary Principal
Once the VPC endpoint service is successfully created, navigate to the “Allow principals tab” and click on “Allow Principals”. Then add the following principal:
743289191656.
 3. Contact the Elementary team to configure the PrivateLink connection
Please provide the Elementary team with the following details:
3. Contact the Elementary team to configure the PrivateLink connection
Please provide the Elementary team with the following details:
- Your AWS account ID.
- Your AWS region.
- The VPC endpoint service name (from step 1).
- The relevant service / integration (e.g. Github).
- The hostname you use internally to connect to your service.
- In the VPC page in your AWS console, go to “Endpoint Services”, and then choose the endpoint service that you created in step 1.
- Under the “Endpoint Connections” tab, you should see a pending connection, select it.
- Click on Actions->Accept endpoint connection request to accept the connection.
 5. Notify the elementary team
Once the endpoint connection is approved and shows as “Available”, please reach out to the Elementary team, so we will ensure the connection is ready and working.
5. Notify the elementary team
Once the endpoint connection is approved and shows as “Available”, please reach out to the Elementary team, so we will ensure the connection is ready and working.